Mirroring Rockstor OS using Linux Raid
Note: this howto is for our near legacy Rockstor 3 only.
Rockstor 4 intends to support a multi-device btrfs system pool as developer time, and upstream support allows
This howto represents an advanced install scenario and should not be required for regular Rockstor use; but is provided as a guide on how to accomplish the specific install arrangement of a redundant system disk install using the more established technology of mdraid, the Linux software raid subsystem. Regular install requirements are met by the default install process covered in our Quick start.
Rockstor uses Anaconda, the CentOS default installer. Although there are many gains to using an upstream installer our specific requirement in this howto of btrfs root on top of mdraid is not catered for. Adding this ability to upstream may well be possible but may also compromise Anaconda’s usability. This is due to the assumption in the installer that if one is using btrfs one will not be using mdraid; due most likely to the redundancy of this option given btrfs has raid capability build in. However, due to the btrfs filesytem’s current maturity level there are still arguments for using mdraid instead of btrfs’s raid for the system disk/disks.
That is the context of this howto and in part explains it’s multi step requirement / complexity but if all steps are followed in order then a working system should result. Note though that the resulting system will require expert administration in the event of a system drive failure.
This install is only suitable for Rockstor versions 3.8-12 and newer.
Why mdraid for the OS
It’s a common and recommended practice to setup redundancy for the OS bits while installing a mission critical Rockstor server. The idea is to combine two Hard Disk Drives (HDDs) in a mirror configuration to house the OS. If one of the HDDs fails, it can simply be swapped out with a new drive saving us from a re-install or downtime.
In this howto we will use Linux Raid to setup the redundant OS drive mirror. This can be done as part of Rockstor’s installation but requires many more additional steps from a default, non mdraid, install. If you have never installed Rockstor before, we recommend you read our Quick start.
The default kickstarter based install method is recommended for most users.
Requirements
You need two HDDs to setup the mirror. We recommend HDDs of the same size and brand for uniformity. The drives can be as small as 8 GB but in practice they are usually 100+ GB. In this howto we demonstrate with a pair of 8GB virtual drives using VirtualBox and then VMM for the later sections to help distinguish the sections of the install.
We will create a mirrored setup for each of the /boot, / and swap partitions. You should plan the sizing of each partition before proceeding further. /boot can be as little as 1-2 GB and will store Kernels. swap can be 1.5-4 GB (no greater than 1.5 times system RAM). / will store most of the OS bits and should be at least 5.5 GB, but more is better. For demonstration purposes in this how-to, our /boot will be 1 GB, our swap will be 1.5 GB, and our / will be all of the remainder i.e. 5.5 GB.
It is recommended not to have /boot and swap the same size as then it can be more difficult to tell them apart in a disaster recovery scenario.
The mdraid install
Due to the reasons outlined earlier this install is unusual in that it requires Rockstor be installed in effect twice. Once to setup mdraid and a second time to setup btrfs on top of the first installs mdraid setup. We also have to use the recovery system between these 2 installs in order that our proposed root md device be formatted as btrfs. The following list summarizes the necessary steps.
Steps 1 - 6 Regular custom partitioned mdraid install with ext4 as the root fs
steps 7 - 8 Use Rescue mode to format our largest mdraid device as btrfs
Steps 9 - 15 Install for the final time using our btrfs on mdraid for root
Although this seems like a round about way to install it is currently the simplest way found without using a custom installer and only requires three command line interventions which helps to keep the process accessible to most users while leaving it as open as possible to further customizations.
Step 1: Device selection
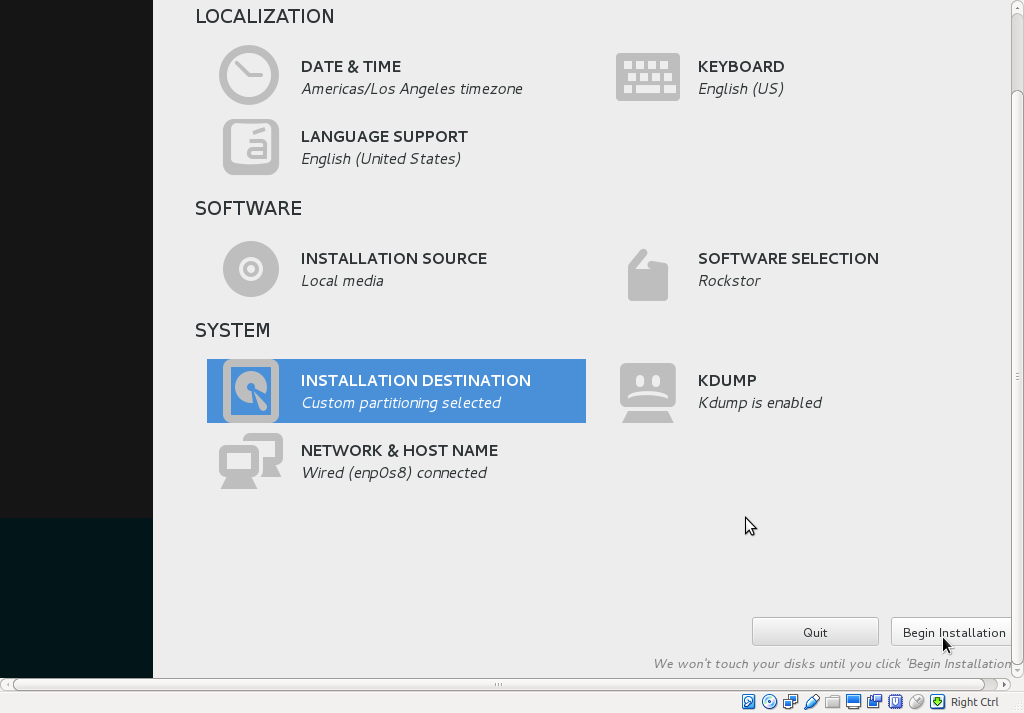
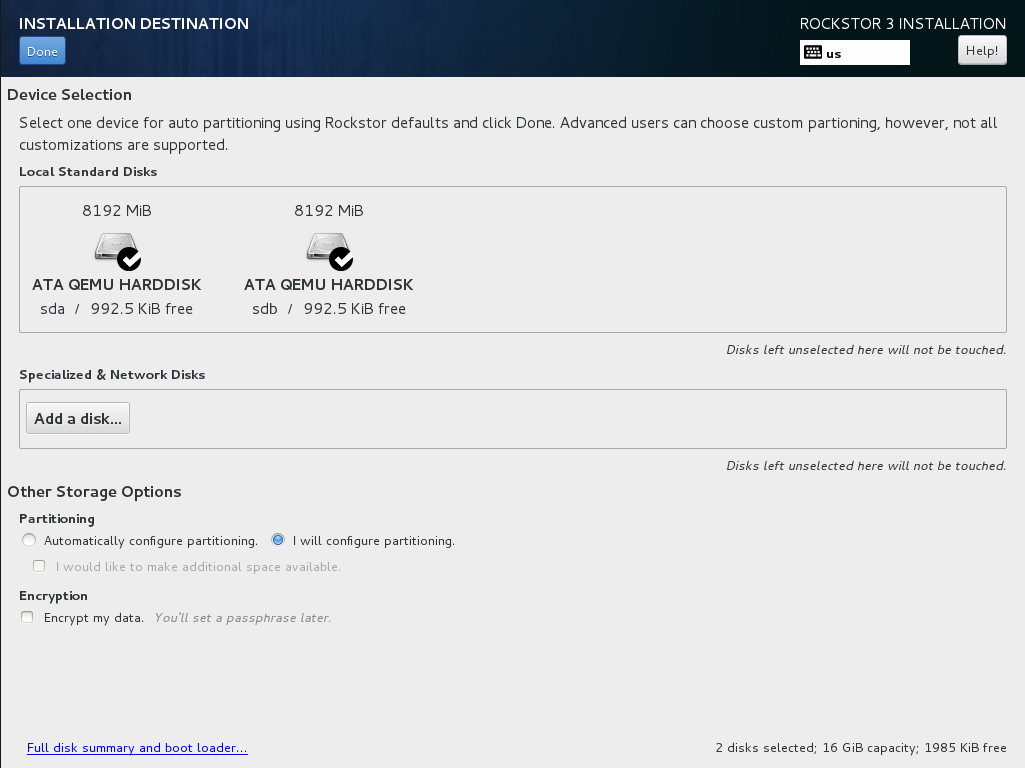
Start the Rockstor installation process and you’ll soon see the INSTALLATION SUMMARY screen. Click on INSTALLATION DESTINATION to go to the device selection screen.
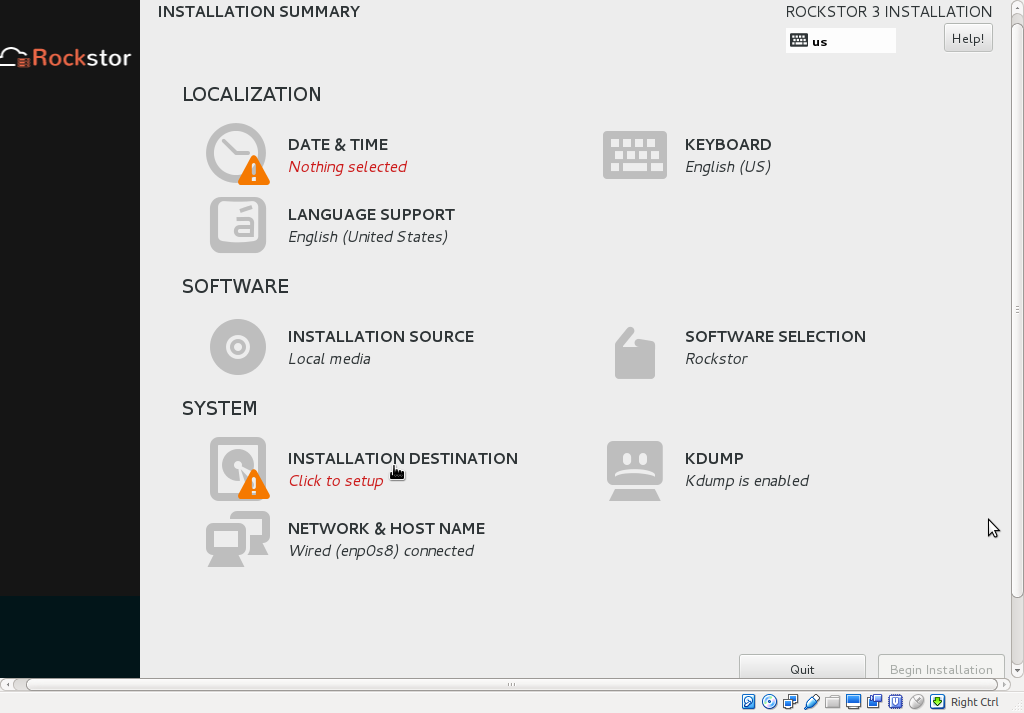
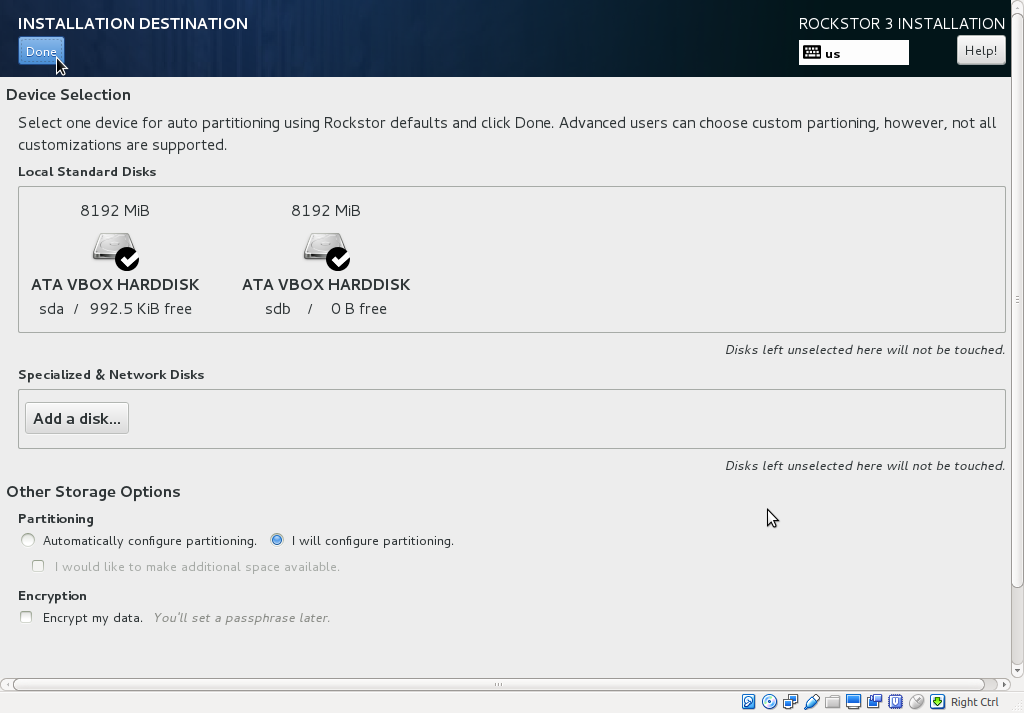
On the next screen, the two HDDs we are about to mirror should be visible. Click to select them so that both are ticked. In the bottom half of the screen, select the I will configure partitioning radio button. Finally click DONE at the top left.
Step 2: Destroy old data, if any
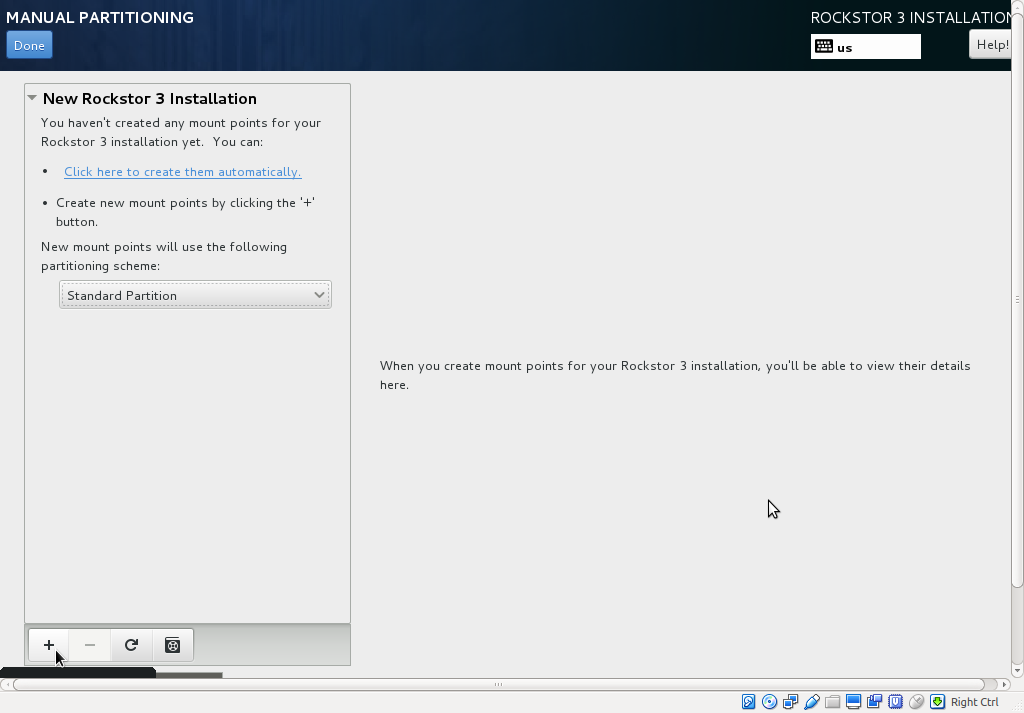
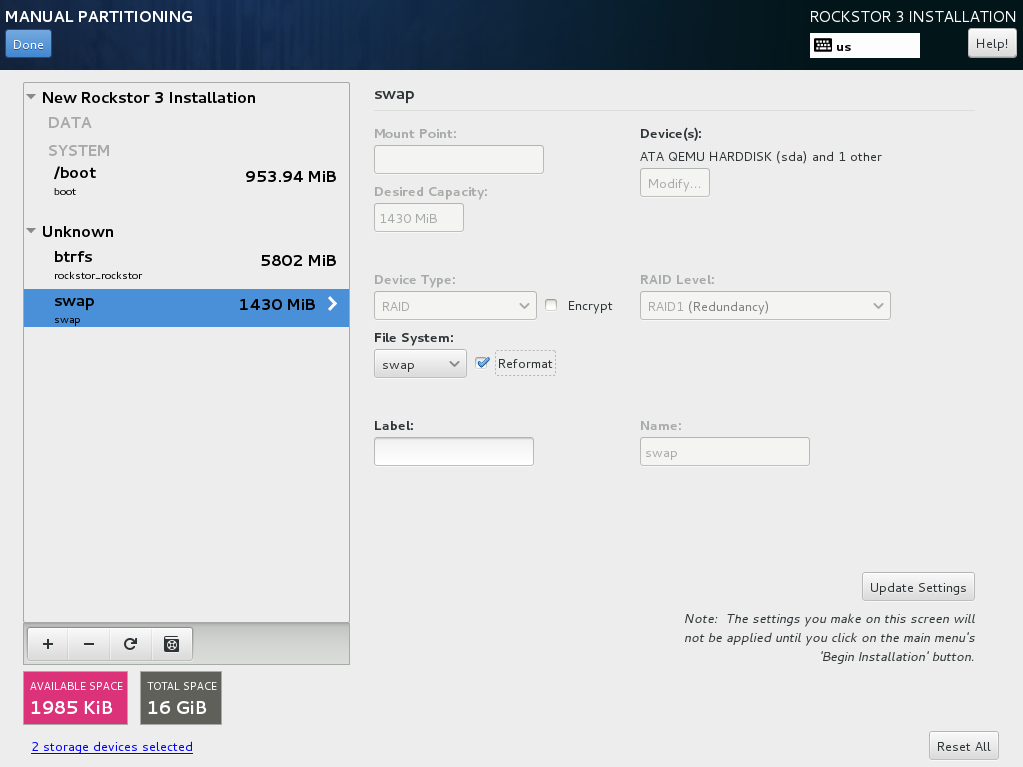
The next screen is titled MANUAL PARTITIONING as shown below. If there are any partitions already on the two HDDs selected before, they will appear on the left under a collapsible menu. If you don’t see any, your HDDs are clean and you can ignore this step. In our demonstration, HDDs are not clean and the existing partitioning is titled UNKNOWN
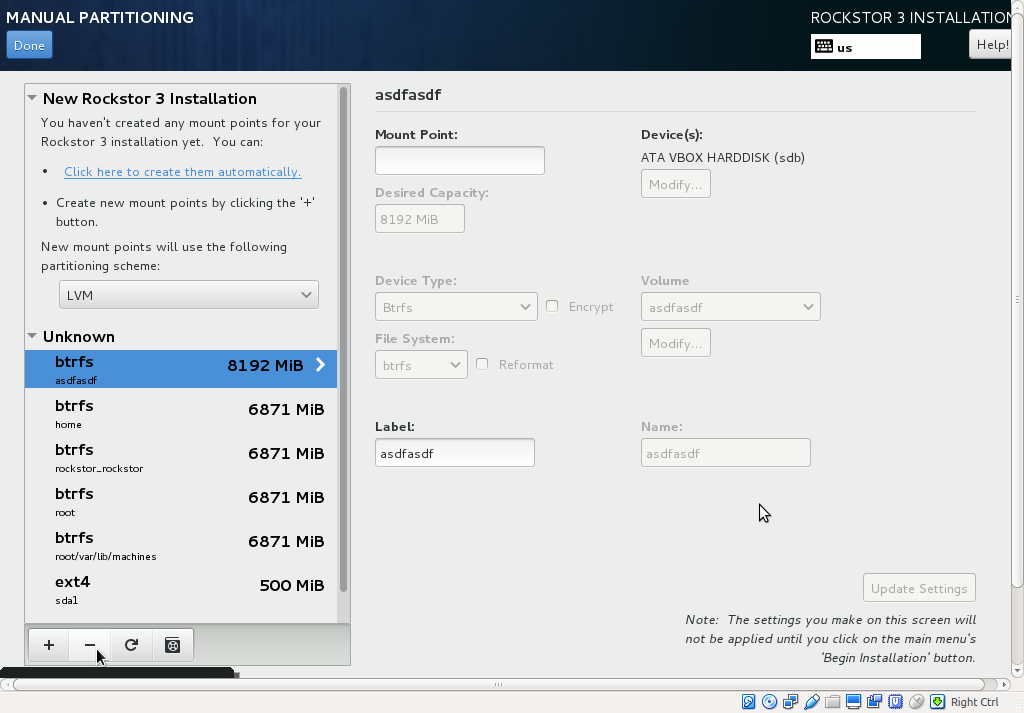
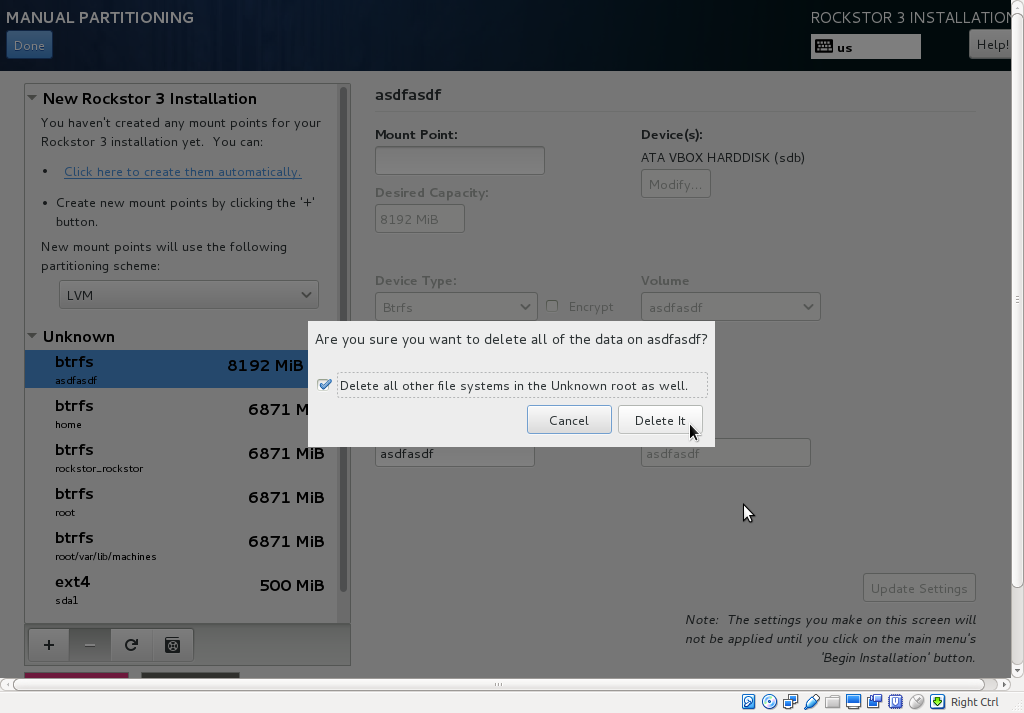
Click on the - button at the bottom to delete these partitions. Repeat this process until all of them are deleted, ot tick the dialog option to do the same.
Step 3: Setup /boot partition
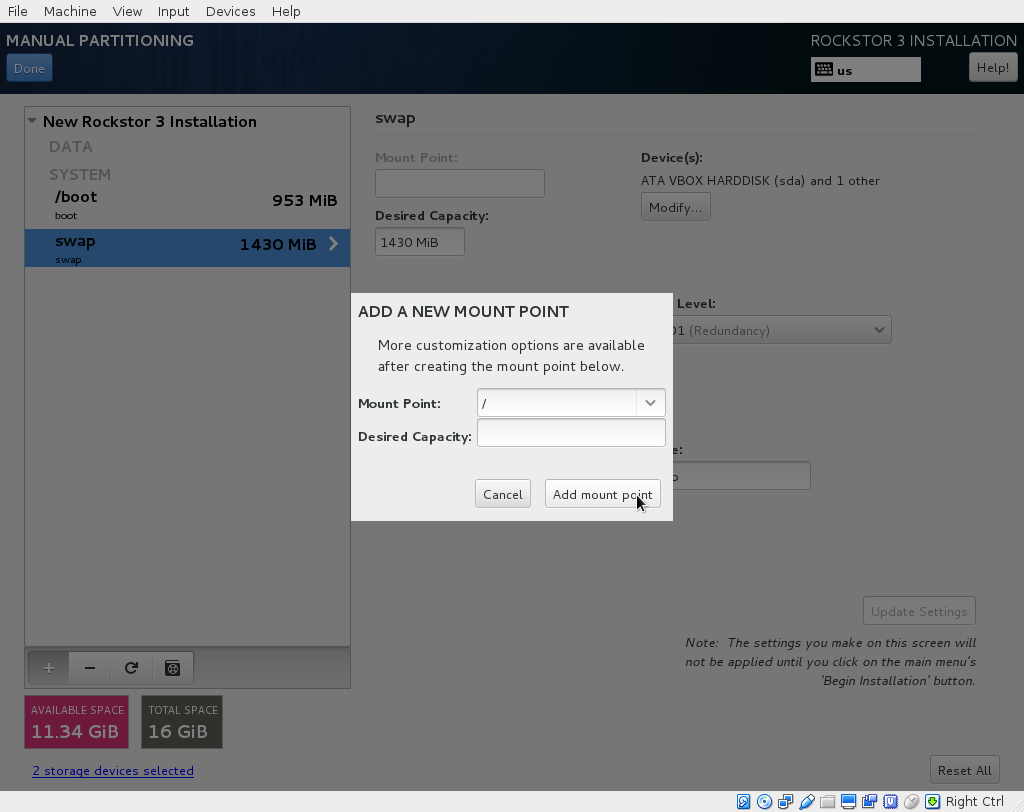
Select Standard Partitioning from the drop down menu and click the + button at the bottom left to create a new partition.
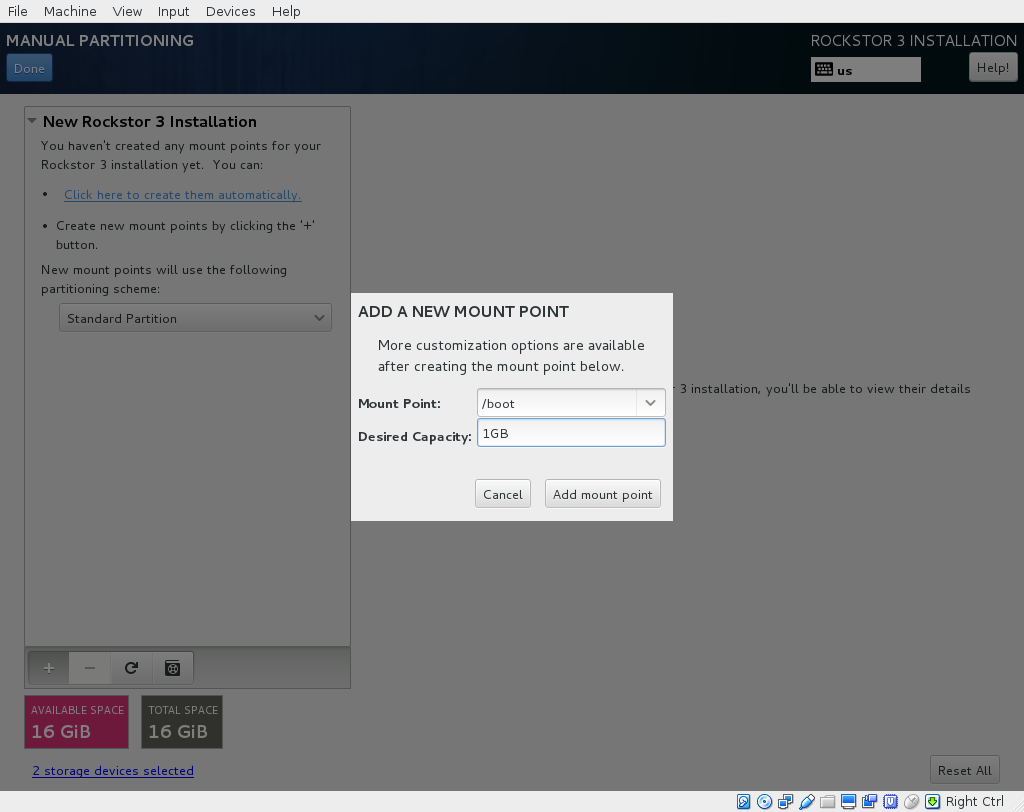
A popup window will appear titled ADD A NEW MOUNT POINT. Select /boot from the drop down, enter the size you planned out earlier (minimum 1GB) and click Add mount point button.
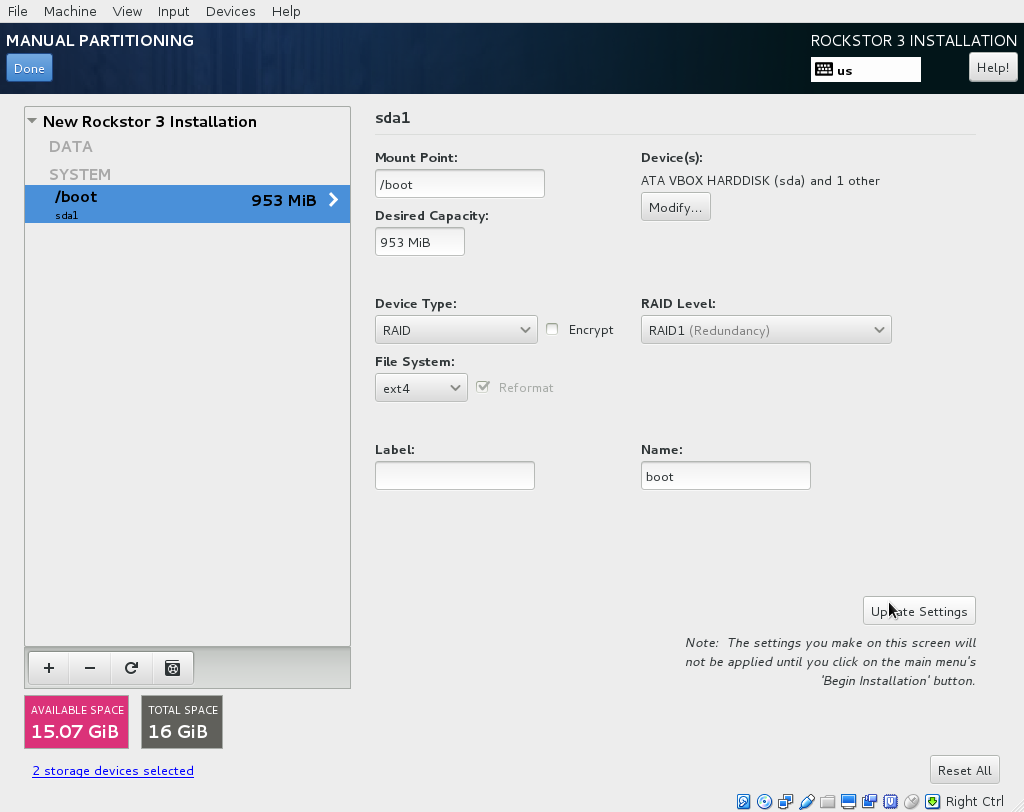
On the next screen, select RAID under Device Type, RAID 1 under RAID Level (the default) and ext4 under File System. Click Update Settings button (bottom right) to finalize the /boot partition setup.
Step 4: Setup swap partition
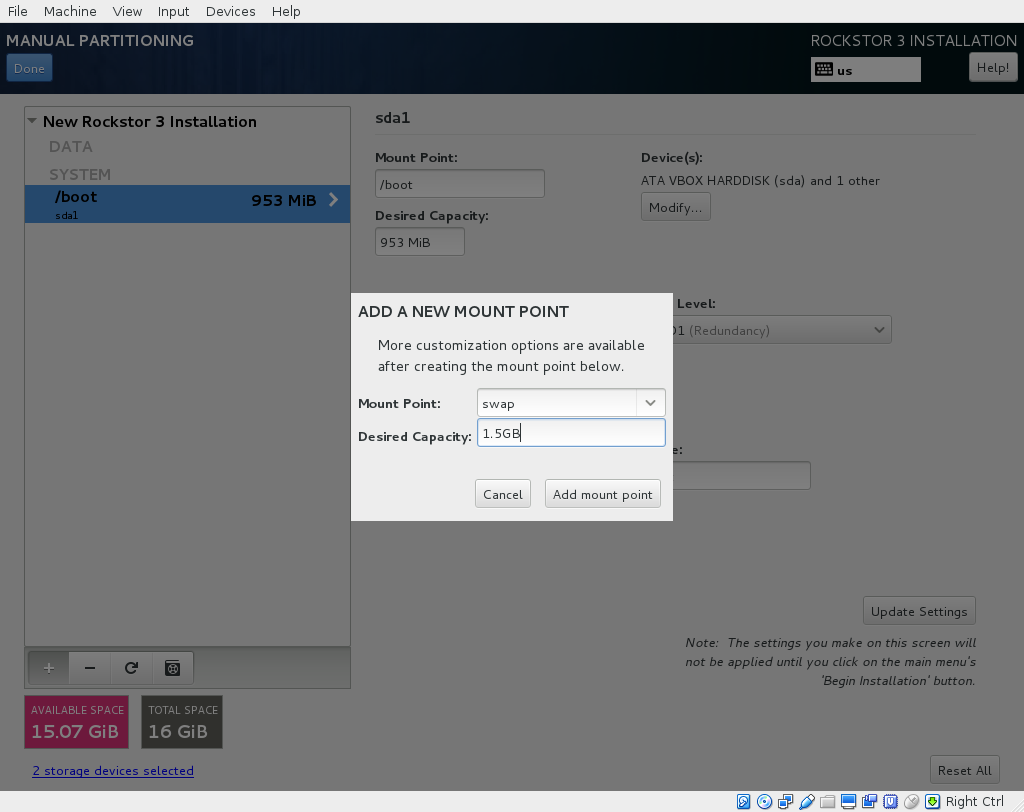
Click the + button at the bottom left to add the swap partition. The procedure is just like above but pick swap from the drop down, enter the appropriate size (1.5-4GB recommended) and click Add mount point.
On the next screen, select RAID under Device Type, RAID 1 under RAID Level (the default) and swap under File System. Click Update Settings button (bottom right) to finalize swap partition setup.
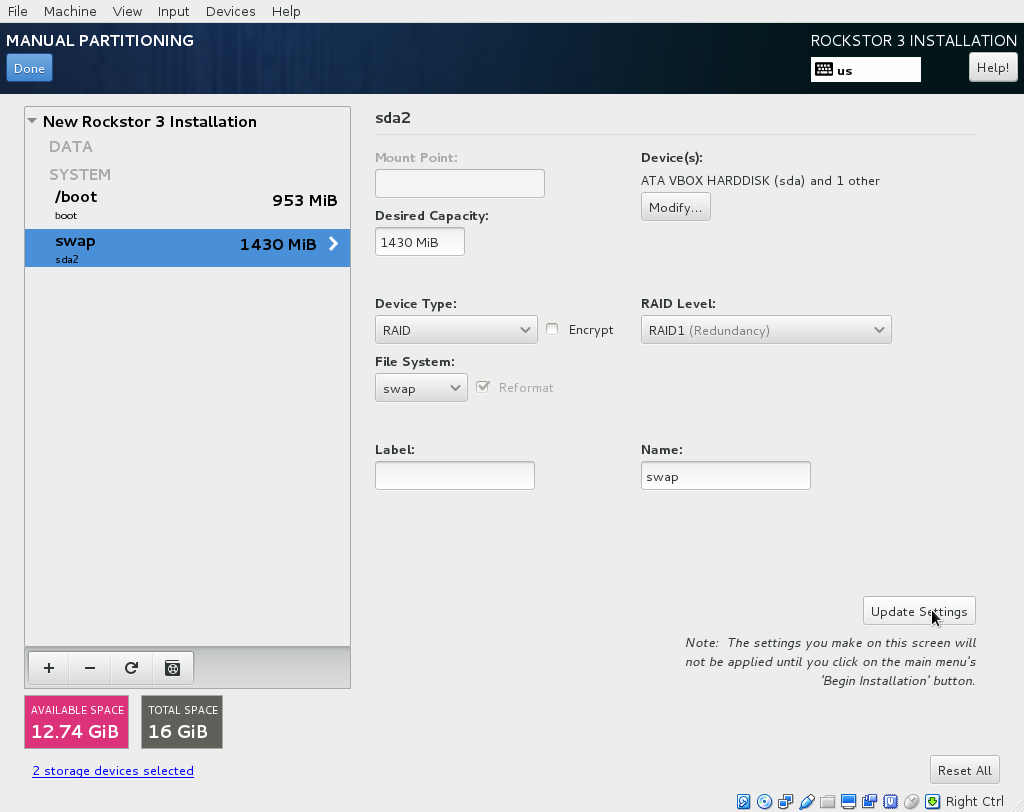
Redundancy on the swap partition may well introduce a performance overhead, but it does allow for hot replacement of a system raid drive if all partitions on the drive are setup with mdraid giving greater protection from drive faults. Otherwise it would be necessary to shut the machine down prior to removing or replacing a raid member drive. If live replacement is not a requirement or your hardware doesn’t support hot swapping then you can keep the default Standard Partitioning selection. This will result in a single drives swap being used until full and then the second drives swap will be used there after. Assuming a swap partition is placed on each drive. Note that this will not protect against drive failure as there will be no redundant mdraid device under the swap device.
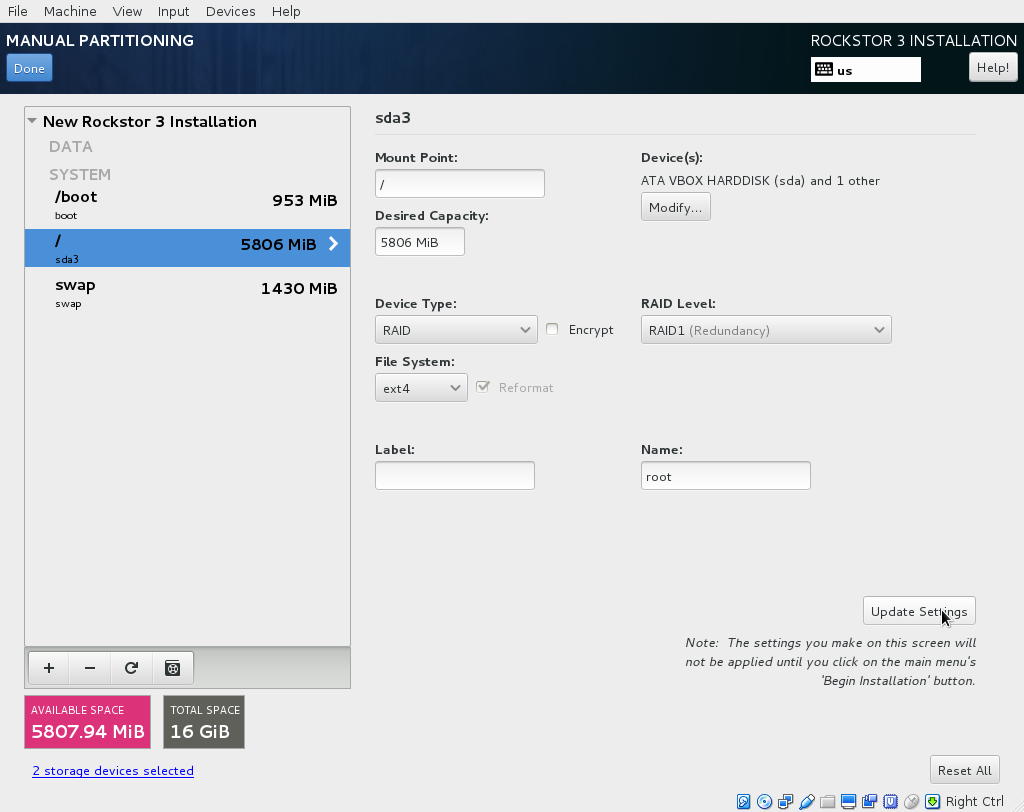
Step 5: Setup / partition
Just like in /boot above, click on the + button and pick / from
the drop down. Leave the size field blank and all of the remaining space will
be used. As we planned the sizes ahead of time, this will come out to be at
least the minimum size of 5.5 GB given our 8 GB system devices minus the
/boot and / partitions. If we are using a larger than minimum
system drive size then any remaining space will result in a larger root
partition which is where the space will be most useful anyway.
On the next screen, select RAID under Device Type and RAID 1 under RAID Level. Click the Update Settings button to finalize the / partition setup.
Step 6: Accept Changes and proceed
Click DONE at the top left of the screen and then click on Accept Changes to finalize the manual partition scheme. N.B. due to edits in this document the Destroy Format entries are not reflective of the removed partitions indicated earlier. Depending on your existing partitions, if any, these entries will vary.
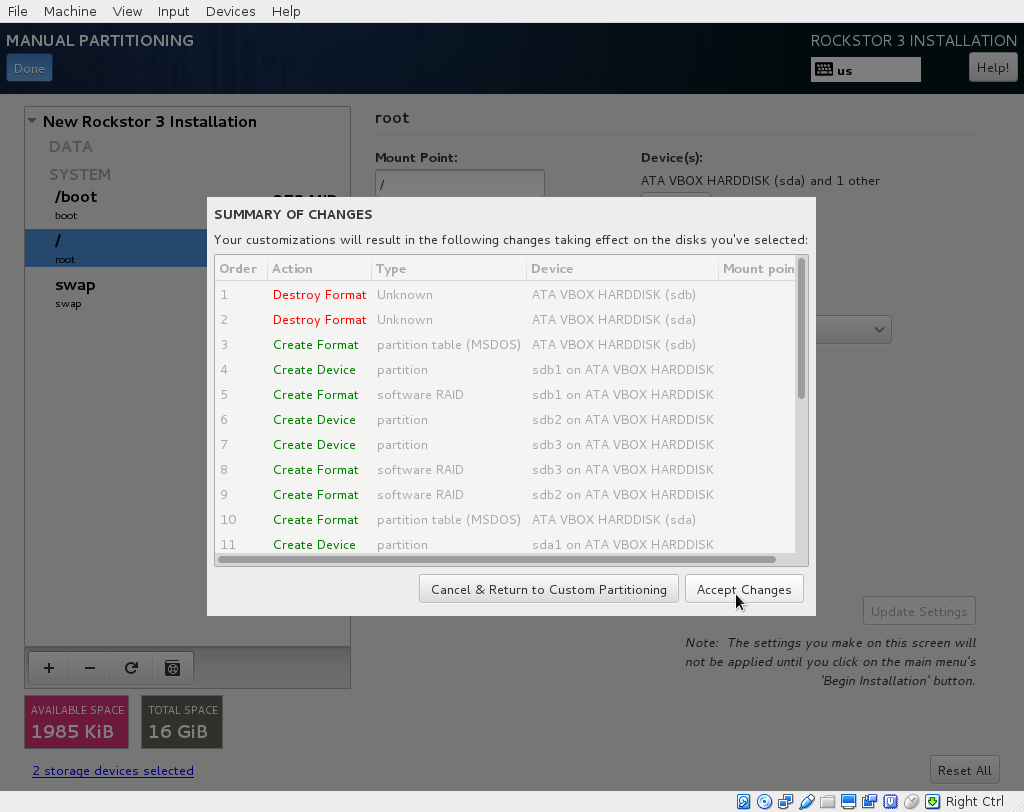
Note also in the above how the installer is about to create new partition tables on both devices and the associated partitions and the mdraid device counterparts for each of the /boot, swap, and / mount points.
The installer will then display the INSTALLATION SUMMARY screen. Click on Begin Installation button at the bottom right to start the install. In this demonstration, we did not show other configurations such as selecting Time Zone and making sure there’s network connectivity. If you need assistance with these refer to our Quick start guide.
Let the installer finish but be sure to leave the installation media in place ie do not remove the installer USB / CDROM / DVD as we must next boot into the troubleshooting section of the installer.
Step 7: Start the Troubleshooting shell
If steps 1 to 6 were followed correctly we should now be rebooting into the installer once again. This is to use the Troubleshooting shell of the installer to reformat our ext4 root mdraid device to a btrfs one:
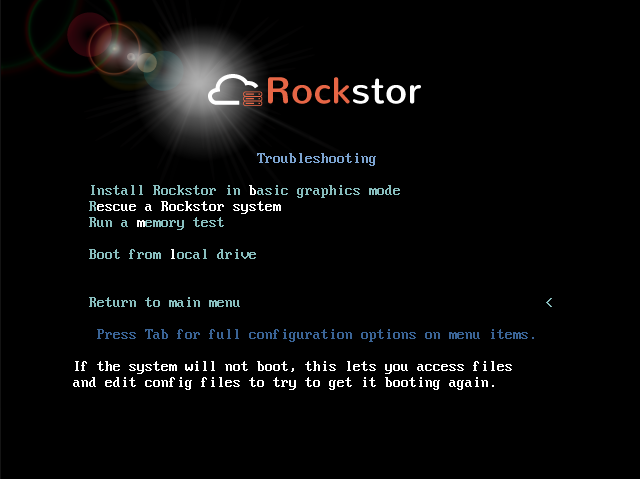
This time on booting the installer select the Troubleshooting section:

Then Select the Rescue a Rockstor System option:
Note:
Selecting this in the 3.9.1 version of the install image will result in a long list of:
Warning: dracut-initqueue timeout - starting timeout scripts before entering
an emergency mode
To prevent this press the tab key on the Rescue a Rockstor System option and change:
vm linuz initrd=initrd.img inst.stage2=hd:LABEL=Rockstor\x203.0\x20x86_64 rescue quit
to:
vm linuz initrd=initrd.img inst.stage2=hd:LABEL=Rockstor\x203\x20x86_64 rescue quit
and press enter to continue as normal
At the following screen select Skip using the Tab and Enter keys.
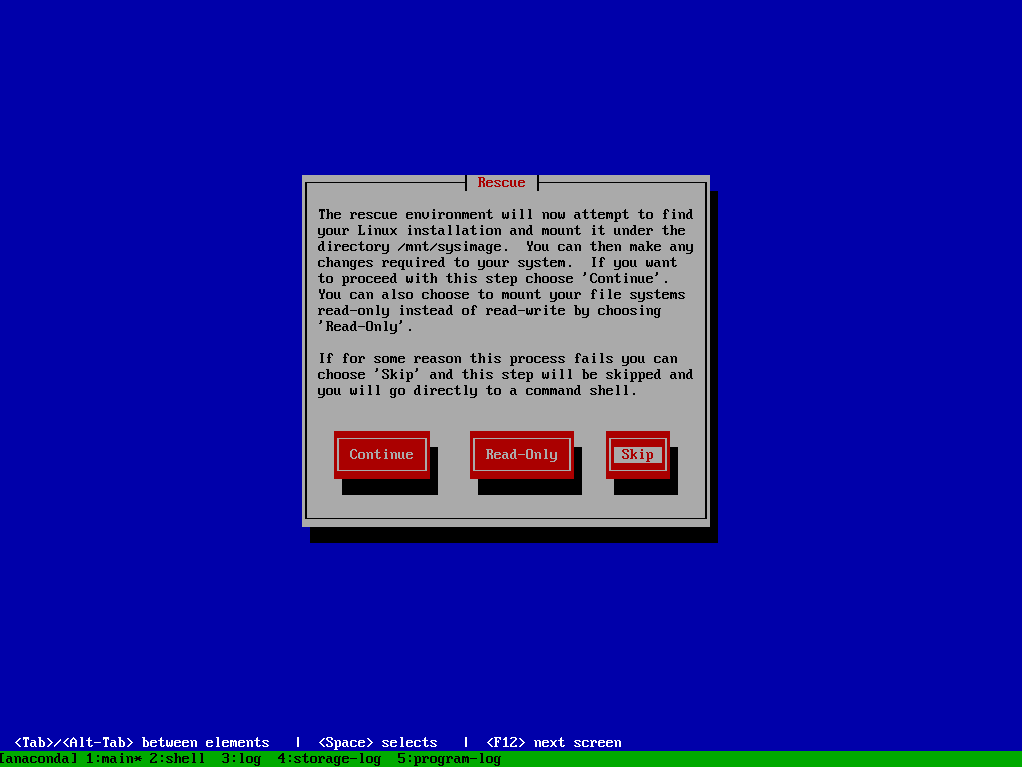
Enter to select Skip
Step 8: Change our root mdraid to btrfs
We can now use this shell system to reformat our largest mdraid device (i.e. root).
Find the largest md device by block count
Reformat that md device as btrfs with a label of rockstor_rockstor
Exit back to the installer
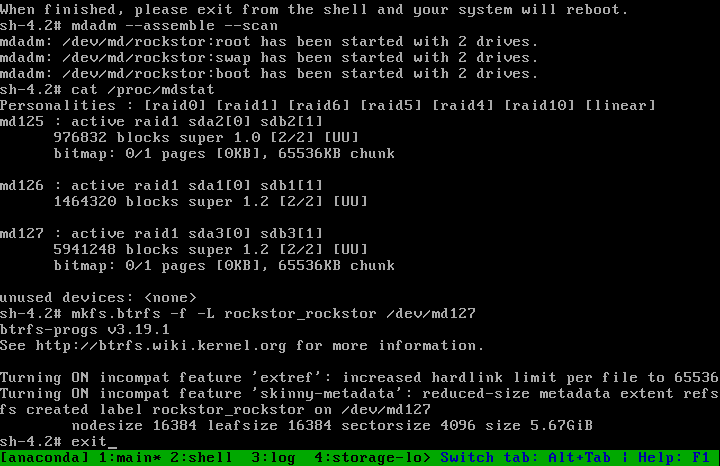
mdadm --assemble --scan
cat /proc/mdstat
mkfs.btrfs -f -L rockstor_rockstor /dev/md###
exit
Note that md### is the name for the largest md device displayed by mdstat.
The following image shows the intended result of these commands:
Note you may not receive the TRIM message if not using ssd devices.
Again Leave the installer media in place for the final install.
Step 9: Reboot into the final install
Next we repeat our first install but this time we re-use the existing mdraid devices for /boot and swap and add our /home and /root subvolumes to the btrfs file system created in the previous step, ie labeled rockstor_rockstor.
Make sure both boot drives are ticked as before
Select I will configure partitioning as before
Done to proceed.
N.B. If a mistake is made in any of the following steps you can use the refresh icon (lower left) in all of the following MANUAL PARTITIONING screens and after clicking Rescan on the resulting dialog you will be returned to this stage where you can simply reselect both drives and try again.
Step 10: Reuse our boot mdraid
IMPORTANT Select btrfs for the partitioning scheme (centre left)
Expand the Unknown section and highlight ext4 boot ie the 1GB device and configure it as our mdraid boot:
Mount Point - /boot
File System - ext4 and tick Reformat

Click the Update Settings to save the mount point and reformat changes and see the partition move from the Unknown section to the SYSTEM section. This is visible in the next step’s first image.
Step 11: Reuse our swap mdraid
Now highlight the swap entry in Unknown and configure the following:
tick Reformat
Again confirm the Reformat change using the Update Settings button.
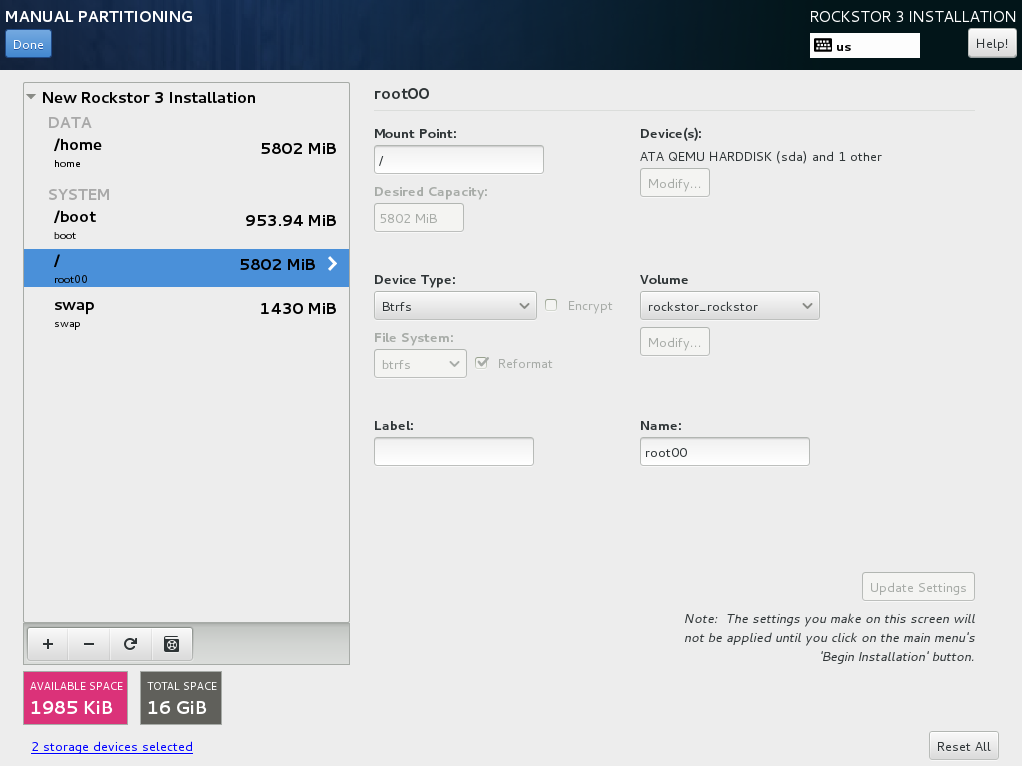
Step 12: Create our root subvolume
Now highlight the btrfs rockstor_rockstor entry in Unknown and click on the + icon in the lower left.
Mount point /
Desired Capacity leave blank as quotas will define the size limit.
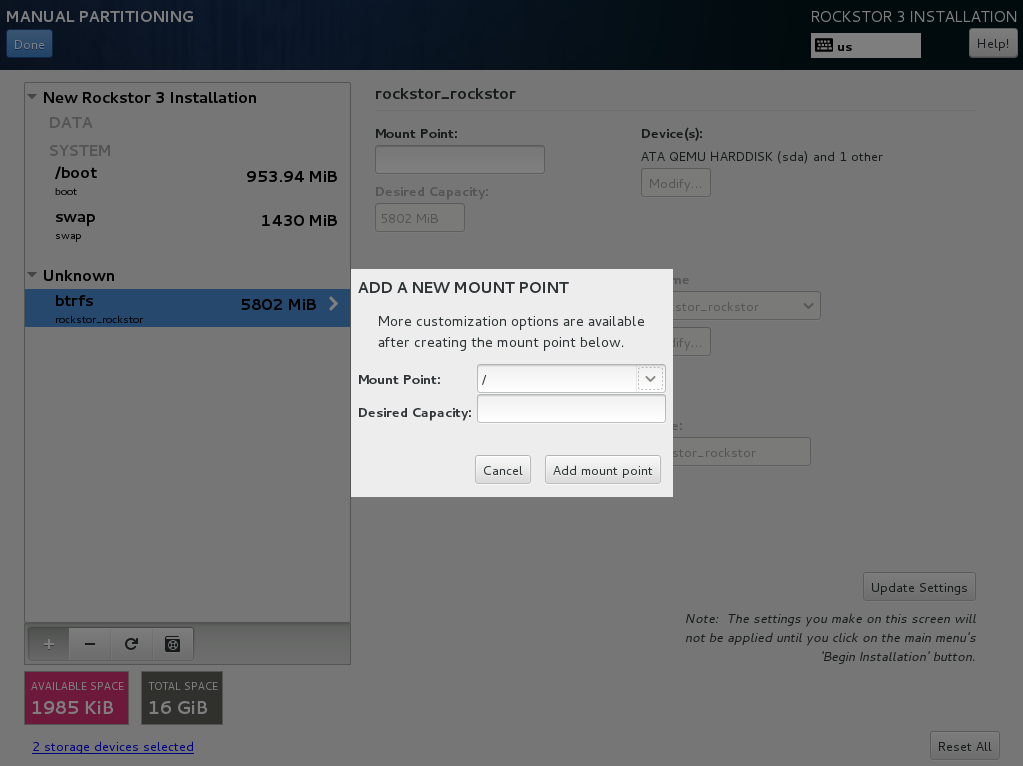
Add mount point to proceed.
N.B. the default name given to our root subvolume is root00 as an artifact of our method or as a bug in the installer. This does not respond to being changed but should be fine as is. This is a visible difference between an mdraid install and a default install.
Step 13: Create our home subvolume
Now that the rockstor_rockstor btrfs mdraid device has been used we no longer have an Unknown section but we can still create further subvolumes so to end up with the same as a regular Rockstor default install we create a home subvolume by again clicking on the + icon:
Mount point /home
Desired Capacity leave blank as quotas will define the size limit.
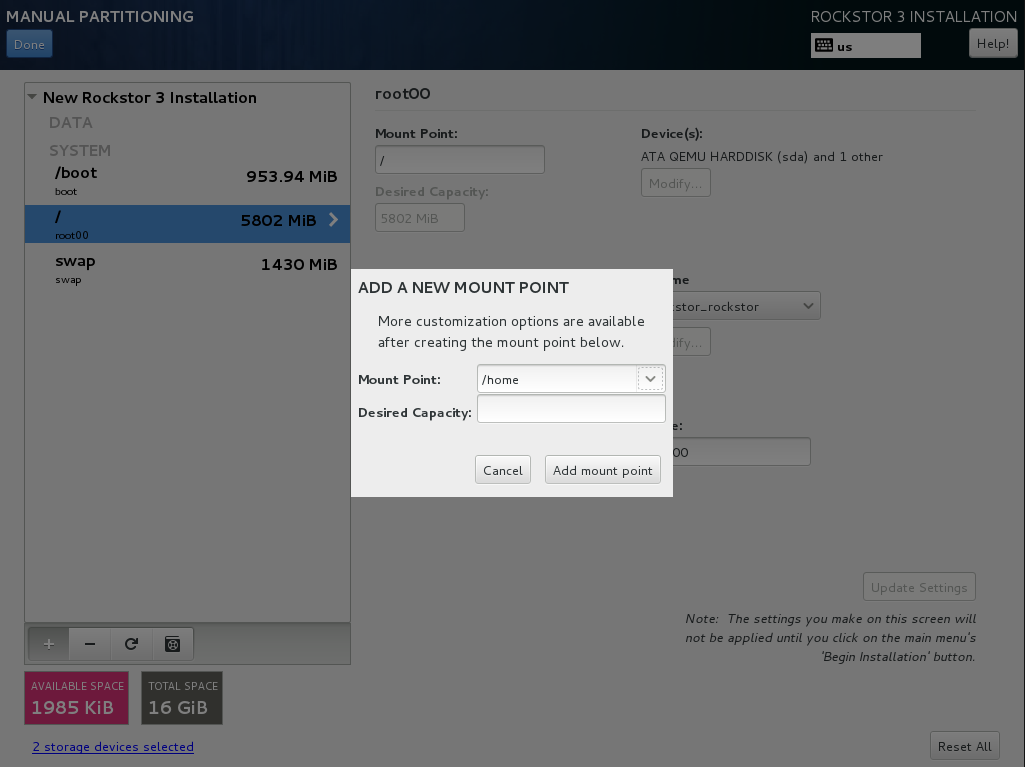
Add mount point to proceed. Notice how the installer puts the /home subvolume into the DATA section.
Don’t worry about the Available Space and Total Space readings as they are not apparently aware of our mdraid levels but this does not affect the final install.
Step 14: Confirmation before final install
If all has gone as planned we should have something along the lines of the following:
Notice that due to the install not knowing our rockstor_rockstor btrfs is not on an mdraid it simply reports our /home and / mounts as Device Type btrfs and Volume rockstor_rockstor.
So finally we have our btrfs on / with ext4 /boot and swap, each on their own mdraid device.
If something is not right remember the refresh icon explained in Step: 9 above as this is the last opportunity for it’s use.
If all looks well then Click Done and proceed.
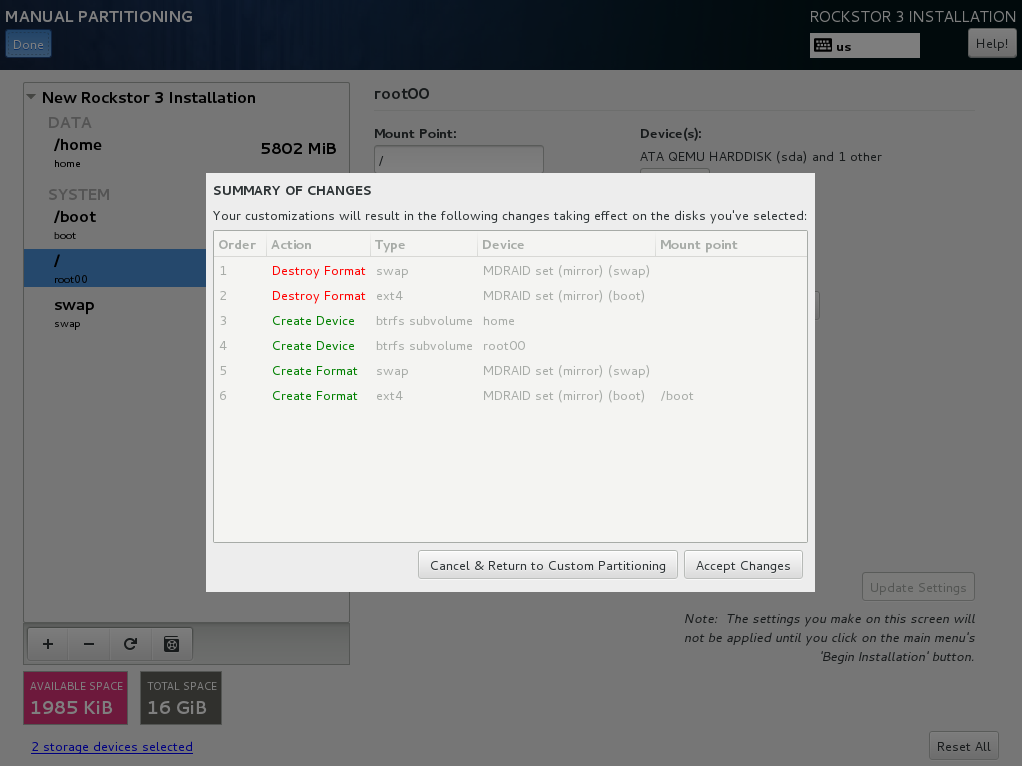
Note in the above that the format of the swap and boot are to be destroyed and re-created but there is no mention of our rockstor_rockstor file system, only the creation of the home and root00 subvolumes.
Accept Changes and Begin Installation as in the first install.
Remember that this time around we don’t need to reboot into the installer again, ie on completion of the install we can change the bios to boot from one of the devices in our mdraid system array.
N.B. If the mdraid array did not complete it’s initial sync phase by the end of the final install then expect extended delays of up to a few minutes on the first boot of the installed system before the web interface becomes available. Also note that it may be necessary to press the carrage return on the initial console display to acquire the ip message, this is also caused by the extended delays as the system is busy syncing the mdraid in the background. This issue mainly affects slow hardware and / or large boot devices. See our Verification of the mirror section for how to read the mdraid’s status.
Note:
After installation you might encounter this message:
Welcome to emergency mode? After logging in, type "journalctl -xb- to view
system logs, "systemctl reboot" to reboot, "systemctl default" or ^D to
try again to boot into default mode.
Give root password for maintenance
(or type Control-D to continue):
and pressing control and D at the same time gives this message:
Error getting authority: Error initializing authority: Could not connect:
No such file or directory (g-io-error-quark, 1) [ 550.771204] BTRFS error
(device md125): subvol 'home' does not match subvolid 5
To fix this and get the system to boot normal first edit the /etc/fstab:
nano /etc/fstab
the fstab should look something like this:
#
#/etc/fstab
#Created by anaconda on Sun Nov 26 08:32:06 2017
#
#Accessible filesystems, by reference, are maintained under '/dev/disk'
#See man pages fstab(5), findfs(8), mount(8) and/or blkid(8) for more info
#
UID=a3a7ba80-54e3-43e5-8e1c-7991c1a8b174 / btrfs subvolid=5,subvol=root00 0 0
UID=49749f09-67ef-4594-9421-e9c5dcefdeea /boot ext4 defaults   1 2
UID=a3a7ba80-54e3-43e5-8e1c-7991c1a8b174 /home btrfs subvolid=5,subvol=home 0 0
UID=559159db-ccOb-4050-b712-eebc4722121e swap swap defaults 0 0
remove the “subvolid=5,” from / and /home like so:
#
#/etc/fstab
#Created by anaconda on Sun Nov 26 08:32:06 2017
#
#Accessible filesystems, by reference, are maintained under '/dev/disk'
#See man pages fstab(5), findfs(8), mount(8) and/or blkid(8) for more info
#
UID=a3a7ba80-54e3-43e5-8e1c-7991c1a8b174 / btrfs subvol=root00 0 0
UID=49749f09-67ef-4594-9421-e9c5dcefdeea /boot ext4 defaults   1 2
UID=a3a7ba80-54e3-43e5-8e1c-7991c1a8b174 /home btrfs subvol=home 0 0
UID=559159db-ccOb-4050-b712-eebc4722121e swap swap defaults 0 0
press control and x to exit and save then press y to confirm you would like to save and enter to confirm the name
Reboot the system (just type reboot and then enter) now the system should boot as normal.
Step 15: Setup
Upon successful first boot, go through the usual process of pointing a browser at the indicated ip (in the Rockstor console) and completing the configuration via the Web interface.

And the resulting Storage - Disks page is as indicated:-
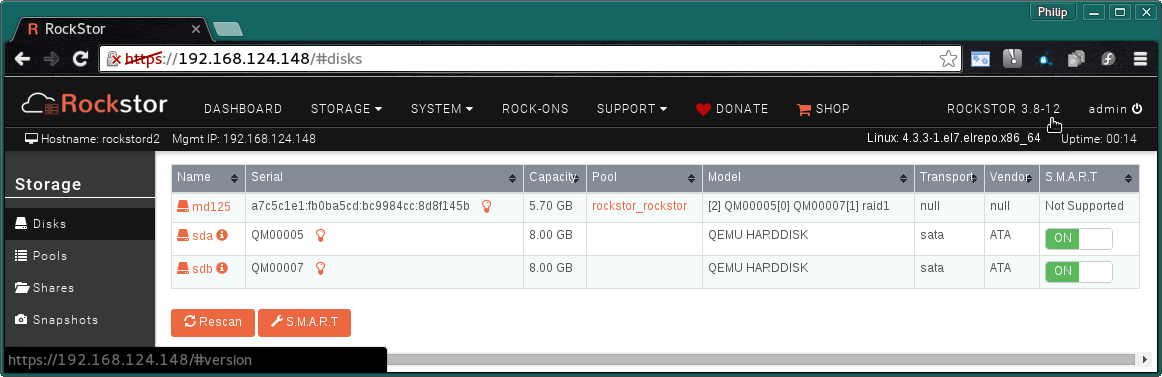
For simplicity Rockstor ignores the swap and boot devices in this display.
Verification of the mirror
It’s a good idea to verify the setup once the installation is finished. You can do that simply with the following command:
# cat /proc/mdstat
Personalities : [raid1]
md125 : active raid1 sdb2[1] sda2[0]
      976832 blocks super 1.0 [2/2] [UU]
      bitmap: 0/1 pages [0KB], 65536KB chunk

md126 : active raid1 sdb1[1] sda1[0]
      1464320 blocks super 1.2 [2/2] [UU]

md127 : active raid1 sdb3[1] sda3[0]
      5941248 blocks super 1.2 [2/2] [UU]
      bitmap: 0/1 pages [0KB], 65536KB chunk
Note that the actual block values will vary for different partition sizes.
The three md* devices correspond to the mirror configuration we setup earlier during the install. Note that each partition is mirrored (raid1) where the counterparts of the mirror are from different drives (sda and sdb in our example). We can also verify that / and /boot are mounted and are the right size with the following command:
# df -h | grep md
/dev/md127      5.7G  1.5G  3.8G  29% /
/dev/md127      5.7G  1.5G  3.8G  29% /home
/dev/md125      923M  121M  739M  15% /boot
/dev/md127      5.7G  1.5G  3.8G  29% /mnt2/rockstor_rockstor
The specific md* device names may vary from install to install, this is why it is a nice idea to have no two md devices of equal size ie /boot 1G and swap 1.5G as it can make discerning a partitions function easier.
The following command shows our swap device:
cat /proc/swaps
Filename           Type        Size     Used  Priority
/dev/md126         partition   1464316  0         -1
Note that the installer will by default continue this raid building / resync process on first boot which may reduce the systems performance. If you are experiencing slow response times on the first boot after install check the raid status using the above cat /proc/mdstat command. On slow hardware it may be advisable to wait until all the md devices have completed their resync. This could take anywhere from minutes to hours, but an estimated time left is given for each md device listed.
Disaster Recovery
Up to this point, we have setup the mirror and verified that everything looks good. Over time, usually after a long time, one of the HDDs may start throwing errors indicating that it’s time to replace it. The following steps will guide you through that process.
Step 1: Remove failing HDD
If your hardware supports hot swapping HDDs, and you chose RAID1 for all your partitions, then you can pull out the failing drive and leave the system running while you replace it with a new HDD. After removing the failing drive, the System continues to run normally, but the mirror is no longer redundant as shown in the below output (note sdb parts are missing):
# cat /proc/mdstat
Personalities : [raid1]
md125 : active raid1 sda2[0]
      976832 blocks super 1.0 [2/1] [U_]
      bitmap: 0/1 pages [0KB], 65536KB chunk

md126 : active raid1 sda1[0]
      5859328 blocks super 1.2 [2/1] [U_]
      bitmap: 1/1 pages [4KB], 65536KB chunk

md127 : active raid1 sda3[0]
      1546240 blocks super 1.2 [2/1] [U_]
Note that the above md names and sizes differ from our demo install above but serve as an example nevertheless.
Step 2: Add a replacement HDD
The next step is to replace the removed HDD with a new one. The same size and brand is recommended, to keep things uniform. In our demonstration, I’ve added a new 8GB virtual drive (similar to the failed HDD) and it appeared as sdb to the system.
Step 3: Partition the replacement HDD
The replacement HDD must be partitioned, much like during OS install. But this time we’ll use command line tools. The advantage of using the same size HDD is that we can just copy the partition scheme from the functioning HDD. In our demonstration, sda is the still functioning HDD and it’s partition table looks as follows:
# sfdisk -d /dev/sda
# partition table of /dev/sda
unit: sectors

/dev/sda1 : start=     2048, size= 11726848, Id=fd
/dev/sda2 : start= 11728896, size=  1953792, Id=fd, bootable
/dev/sda3 : start= 13682688, size=  3094528, Id=fd
/dev/sda4 : start=        0, size=        0, Id= 0
We can copy the partition table of sda to sdb with the following composite command:
# sfdisk -d /dev/sda > /tmp/sda.pt; sfdisk /dev/sdb < /tmp/sda.pt; rm -f /tmp/sda.pt
Checking that no-one is using this disk right now ...
OK

Disk /dev/sdb: 1044 cylinders, 255 heads, 63 sectors/track
Old situation:
Units: cylinders of 8225280 bytes, blocks of 1024 bytes, counting from 0

   Device Boot Start     End   #cyls    #blocks   Id  System
/dev/sdb1          0       -       0          0    0  Empty
/dev/sdb2          0       -       0          0    0  Empty
/dev/sdb3          0       -       0          0    0  Empty
/dev/sdb4          0       -       0          0    0  Empty
New situation:
Units: sectors of 512 bytes, counting from 0

   Device Boot    Start       End   #sectors  Id  System
/dev/sdb1          2048  11728895   11726848  fd  Linux raid autodetect
/dev/sdb2   *  11728896  13682687    1953792  fd  Linux raid autodetect
/dev/sdb3      13682688  16777215    3094528  fd  Linux raid autodetect
/dev/sdb4             0         -          0   0  Empty
Warning: partition 1 does not end at a cylinder boundary
Warning: partition 2 does not start at a cylinder boundary
Warning: partition 2 does not end at a cylinder boundary
Warning: partition 3 does not start at a cylinder boundary
Warning: partition 3 does not end at a cylinder boundary
Successfully wrote the new partition table

Re-reading the partition table ...

If you created or changed a DOS partition, /dev/foo7, say, then use dd(1)
to zero the first 512 bytes:  dd if=/dev/zero of=/dev/foo7 bs=512 count=1
(See fdisk(8).)
Step 4: Rebuild the mirror
This is the final and crucial step. We’ll resync the partitions of the replacement HDD with its working counterpart in the mirror. This can be done with the following composite command:
# mdadm --manage /dev/md125 --add /dev/sdb2; mdadm --manage /dev/md126 --add /dev/sdb1; mdadm --manage /dev/md127 --add /dev/sdb3
mdadm: added /dev/sdb2
mdadm: added /dev/sdb1
mdadm: added /dev/sdb3
After the above step, the mirror is re-synchronized. It will take some time proportional to your HDD size. You can monitor the progress and confirm the finish by looking at the contents of the /proc/mdstat file as shown here:
# cat /proc/mdstat
Personalities : [raid1]
md125 : active raid1 sdb2[2] sda2[0]
      976832 blocks super 1.0 [2/2] [UU]
      bitmap: 0/1 pages [0KB], 65536KB chunk

md126 : active raid1 sdb1[2] sda1[0]
      5859328 blocks super 1.2 [2/1] [U_]
      [=============>.......]  recovery = 68.0% (3985280/5859328) finish=2.0min speed=15366K/sec
      bitmap: 1/1 pages [4KB], 65536KB chunk

md127 : active raid1 sdb3[2] sda3[0]
      1546240 blocks super 1.2 [2/1] [U_]
      resync=DELAYED

unused devices: <none>
Note the estimated time for completion on md126 above ie finnish=2.0mins
The above output indicates that md125 and md127 have finished their recovery (re-sync), but md126 is at 68%. It is completed after a short while as shown again here:
# cat /proc/mdstat
Personalities : [raid1]
md125 : active raid1 sdb2[2] sda2[0]
      976832 blocks super 1.0 [2/2] [UU]
      bitmap: 0/1 pages [0KB], 65536KB chunk

md126 : active raid1 sdb1[2] sda1[0]
      5859328 blocks super 1.2 [2/2] [UU]
      bitmap: 0/1 pages [0KB], 65536KB chunk

md127 : active raid1 sdb3[2] sda3[0]
      1546240 blocks super 1.2 [2/2] [UU]

unused devices: <none>
That completes the disaster recovery section and the howto!
